Abra Desktop dependencies
Abra Desktop requires some command line tools to be installed. These command line tools are part of Android Studio and Xcode.
Open the Abra Desktop Settings to configure your paths for Android and iOS.
Learn more about:
adb
Abra Desktop requires adb. ADB stands for Android Debug Bridge, which we use to communicate with Android devices.
Open the Terminal and run: which adb
Success: path, e.g.
/Users/Abra/Library/Android/sdk/platform-tools/adbError:
adb not foundOpen Android Studio, open Settings, search for "SDK", open Android SDK section, copy the path listed in the "Android SDK Location" field.
The location points to the Android SDK, e.g.
/Users/Abra/Library/Android/sdk. ADB is located in the subfolder/platform-tools/adb.For example:/Users/Abra/Library/Android/sdk/platform-tools/adbTry if ADB is installed correctly, run
/Users/Abra/Library/Android/sdk/platform-tools/adb --versionin the Terminal. It should return output containing:Android Debug Bridge version 1.x.xAdd the ADB path to your
PATH:export PATH=$PATH:<ADB_PATH_COPIED_FROM_ABOVE>Update paths:
source .bash_profileAbra Desktop should now detect ADB when you refresh. If not, you can provide the path manually in the ADB input field.
xcrun
Abra Desktop requires xcrun. Xcrun is used to run Xcode developer tools.
Open the Terminal and run: which xcrun
Success: path, e.g.
/usr/bin/xcrunError:
xcrun not found
devicectl
Abra Desktop requires devicectl. DeviceCtl is used to communicate with iOS devices.
Open the Terminal and run: xcrun --find devicectl
Success: path, e.g.
/Applications/Xcode.app/Contents/Developer/usr/bin/devicectlError:
xcrun: error: unable to find utility "devicectl"
simctl
Abra Desktop requires simctl. SimCtl is used to communicate with iOS simulators.
Open the Terminal and run: xcrun --find simctl
Success: path, e.g.
/Applications/Xcode.app/Contents/Developer/usr/bin/simctlError:
xcrun: error: unable to find utility "simctl"
xcodebuild
Abra Desktop requires xcodebuild. Xcodebuild is used to execute tests.
Open the Terminal and run: xcrun --find xcodebuild
Success: path, e.g.
/Applications/Xcode.app/Contents/Developer/usr/bin/xcodebuildError:
xcrun: error: unable to find utility "xcodebuild"
codesign
Abra Desktop requires codesign. Codesign is a command-line tool used to sign applications, frameworks, and other executable files with a digital signature and comes automatically installed on macOS. Abra Desktop uses codesign to resign dependencies.
Open the Terminal and run: which codesign
Success: path, e.g.
/usr/bin/codesignError:
codesign not foundYou might need to re-install macOS
security
Abra Desktop requires security. Security is a command-line tool to access to the system's keychain services and other security-related features. Abra Desktop uses security to resign dependencies.
Open the Terminal and run: which security
Success: path, e.g.
/usr/bin/securityError:
security not foundYou might need to re-install macOS
iOS DeviceSupport
Abra Desktop requires path to the iOS DeviceSupport folder. The iOS DeviceSupport is created by Xcode and contains symbols and resources needed for debugging and inspecting applications on physical iOS devices.
Open the Terminal and run: open ~/Library/Developer/Xcode/iOS\ DeviceSupport
Success: a Finder window for the iOS DeviceSupport folder
Error:
The file <path> does not exist.You might need to re-install Xcode
Troubleshooting
Below are some general tips and tricks to try if there are still any issues after following the steps listed in the sections above.
Android
If you have any issues using a Android device after installing the required tools, for example you still get the adb not found error some additionals steps may be required.
Open the terminal app
Run the command:
echo $SHELLand check if the output is equal to/bin/zsh.Next run the command:
nano ~/.zshrcthis will allow you to edit the file from the terminal.Depending on the situation this file might be empty (nothing is shown) or it might already contain some text. Both is fine, it simply depends if you've done any modifications to this file earlier.
If the file already contains some information scroll to the bottom of the file before moving to the next step.
Copy the information from below and paste it in your terminal. Adjust this if you changed any settings during the installation process yourself.
After pasting the information press the following combination of keys:
Ctrl + XIt will ask if you want to save the changes to your file, simply choose
YNext it will ask which file to save the changes to, you can simply confirm the default name by pressing
EnterRun the following command to apply your changes:
source ~/.zshrcTry running
which adbagain and it should work as expected. Abra Desktop should be able to find it automatically for you as well.Still having issues automatically setting the value, copy the output from the
which adbcommand and paste it in manually. Please don't forget to hit save after adding the information.
# Android SDK
export ANDROID_HOME=$HOME/Library/Android/sdk
export PATH=$PATH:$ANDROID_HOME/emulator
export PATH=$PATH:$ANDROID_HOME/tools
export PATH=$PATH:$ANDROID_HOME/tools/bin
export PATH=$PATH:$ANDROID_HOME/platform-tools
iOS
After installing Xcode it should be able to automatically find the paths for all required tools, if you face any issues check the error message and check solutions below.
Xcode should automatically install all required command line tools, but as a first step we should verify this actually is the case. We can do that by starting Xcode. Especially the first time it might take a little while before it starts.
In the top left corner choose
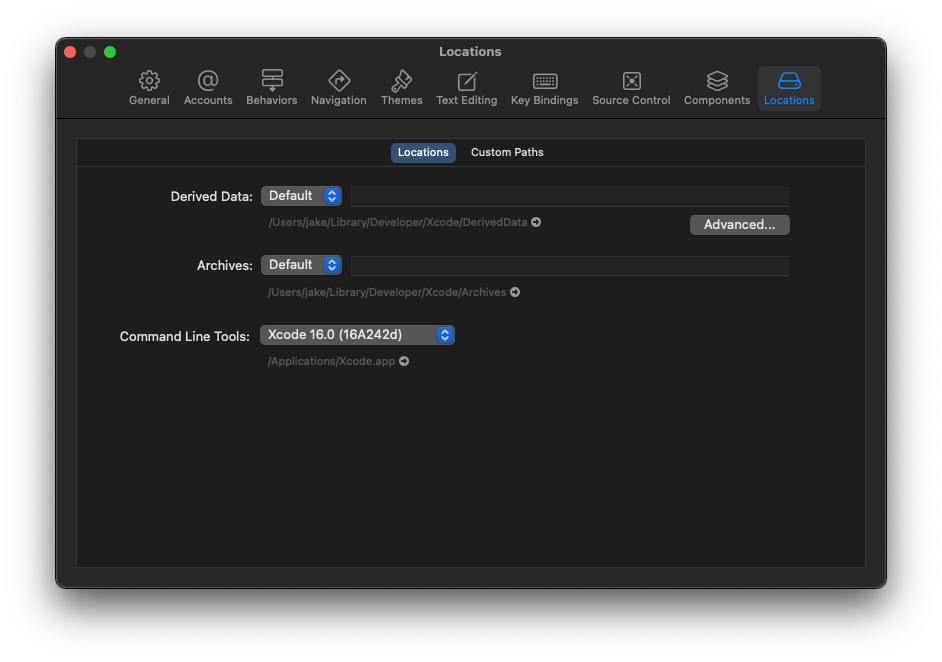
Xcode > Settings > Locationsor by using the shortcutcmd + ,Check if the commandline tools are selected in the window that pops up.
It should list the commandline tools for the current Xcode version. Pay special attention to the grey text below the dropdown and check it matches the one from the image below.
 If the text does not match the screenshot but instead shows
 (No Xcode Selected)Abra Desktop is not able to detect the paths automatically. This sometimes happens if the commandline tools are installed after Xcode is installed. Luckily we can easily fix this.Assuming you installed Xcode in the applications directory which is the default run the following command:
sudo xcode-select -s /Applications/Xcode.app/Contents/Developer/this should prompt you for your password, simply enter your password and hit enter.You should now be able to verify the tools work by running the following command:
xcrun --find simctlthis should run succesfully now.